Description
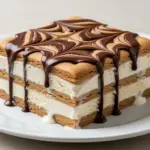
A no-bake, freezer-friendly ice cream sandwich cake that is perfect for summer parties and Labor Day celebrations. It features layers of chocolate sandwich cookies and vanilla ice cream, coated in a smooth dark chocolate shell.
Ingredients
Scale
- 2 packages (about 40 cookies) Chocolate Sandwich Cookies (e.g., Oreos)
- 1 quart (950ml) Vanilla Ice Cream (full-fat, premium)
- 1 cup (170g) Dark Chocolate Chips (60% dark preferred)
- 2 tablespoons Coconut Oil
- Flaked Sea Salt (optional, for topping)
- ½ cup White Chocolate Chips (optional, for drizzle)
- Red Food Coloring (a few drops, optional)
- ½ cup Chopped Nuts (pecans or walnuts, optional)
- Red, white, and blue Sprinkles (optional)
Instructions
- Line a 9×13 inch baking pan with parchment paper, leaving an overhang on the long sides for easy removal.
- Take the vanilla ice cream out of the freezer and let it soften on the counter for 15-20 minutes until it is scoopable but not melted.
- Arrange a single layer of 20 chocolate sandwich cookies in the bottom of the prepared pan, pressing them down gently to create a flat base.
- Scoop the softened ice cream over the cookie layer and spread it evenly with an offset spatula to create a smooth, 1-inch thick layer.
- Place the pan in the freezer for 30 minutes to set the ice cream layer.
- Remove the pan and arrange the second layer of 20 cookies on top of the set ice cream, pressing gently so they adhere.
- Return the pan to the freezer for at least 1 hour (or up to 2 hours) until the cake is completely firm.
- While the cake freezes, melt the dark chocolate chips in a microwave-safe bowl in 30-second intervals, stirring between each, until smooth. Stir in the coconut oil until fully incorporated.
- Remove the cake from the freezer and invert it onto a parchment-lined baking sheet so the bottom cookie layer is on top.
- Pour the melted chocolate mixture over the top, using an offset spatula to spread it evenly over the top and down the sides for full coverage.
- If using, melt white chocolate separately and drizzle it over the dark chocolate coating. Sprinkle with flaky sea salt and festive sprinkles while the chocolate is still wet.
- Allow the coating to set at room temperature for 10 minutes or in the freezer for 5 minutes.
- Lift the cake out of the pan using the parchment overhang, place on a cutting board, and slice into squares using a sharp knife dipped in hot water and wiped dry between cuts.
Notes
Ensure ice cream is softened but not melted before spreading to avoid cracking cookies. Use high-fat ice cream for a creamier texture. The cake can be made up to 2 weeks in advance and stored in the freezer. For clean slices, dip the knife in hot water and wipe dry between cuts. Do not store in the refrigerator as it will melt.
- Prep Time: 30 minutes
- Cook Time: 0 minutes
- Category: Dessert
- Cuisine: American
Nutrition
- Serving Size: 1 square slice
- Calories: 350
- Sugar: 30
- Sodium: 200
- Fat: 18
- Saturated Fat: 10
- Carbohydrates: 45
- Fiber: 2
- Protein: 4
Keywords: Labor Day dessert, ice cream cake, no bake dessert, summer party food, chocolate ice cream sandwich, festive dessert, make ahead dessert